You will need to download the required BIOS from the Dell website, in ‘Non-Packaged’ File Format. I also used Rufus to create a bootable USB drive
R710 BIOS 6.4.0 – R710-060400C.exe\ http://www.dell.com/support/home/us/en/19/Drivers/DriversDetails?driverid=4HKX2
Rufus 1.4.12\ http://rufus.akeo.ie/downloads/rufus-1.4.12.exe
Once you have got the above we can begin to create our Bootable USB
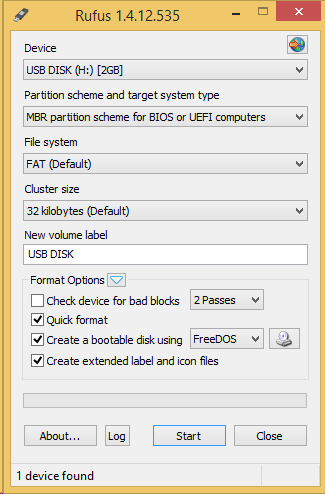
- Plug in your USB drive and open Rufus.exe
- From the Device drop down select your USB drive
- Leave the other large drop downs as default
- Label the USB drive if required
- Check the 2nd, 3rd and 4th check boxes
- Ensure FreeDOS is selected from the smaller drop down
- Press Start

Running the Update
Your new bootable drive will show within Windows Explorer, open it and copy your BIOS .exe download to the root of the drive.\ Rename the .exe to something simpler, such as R710.exe (this will help later).
Insert the USB in to the server and boot, when prompted pressF11to Enter Boot Menu.\ Use the arrow keys to highlight ‘Hard Drive C:’, on the sub-menu select your USB device and press enter.
When at the command prompt type inR710.exe(if you did not rename the file in the earlier steps you will need to use the original name at this point). You will be entered in to the BIOS updater screen. Follow the steps until completion
Forcing a BIOS Update
If you wish to re-flash your BIOS with the same version as already installed, or if you need to replace an OEM BIOS you might need to use/forcetypein order to force a BIOS update.
E.g. – `R710.exe /forcetype`


