There are quite often occasions when you need to utilise vRO for sending out your email, there are a couple of ways of doing this, such as creating the HTML yourself with JavaScript code - or you can utilise Resources within vRO and store a HTML file.
This is the method we are going to walk through today. We are obtaining information from two places, the VC:VirtualMachine object, and also from its related vCAC:VirtualMachine - as the VMs in question have been deployed from vRA.
For the sake of this article, we are only retrieving simple information, but you can get it from anywhere - a payload directly from a vRA EBS event, an external system, etc - the method for replacing data remains the same.
#Create the HTML template
This is going to be a relatively simple HTML template, in this scenario we need to email a user with specific information from their VM.
<html>
<body>
  <p>================</p>
  <p>Please find your VM details below;</p>

  <ul>
    <li>VM Name = {{vmName}}</li>
    <li>Expiry Date = {{expiryDate}}</li>
    <li>IP Address = {{ipAddress}}</li>
    <li>Memory = {{memory}}</li>
    <li>CPU = {{cpu}}</li>
    <li>Guest OS = {{guestOs}}</li>
  </ul>

  <p>================</p>
</body>

</html>
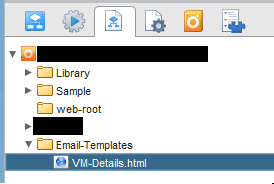
Once your template has been created, save it as VM-Details.html upload it to the Resources section within vRO, under a folder called Email-Templates.

#Create the Workflow
Next, create your workflow - you will need two items in it. A script element, which we will add the below code in to, and we will make use of the Send notification workflow, which is found out of the box, under Library > Mail.

Create one input in to the script element, name vm of type VC:VirtualMachine and one output called emailContent of type string. Copy in the below code.
/*
  - Input: vm [VC:VirtualMachine]
  - Output: emailContent [string]
*/

var vmName = vm.name;
var ipAddress = vm.ipAddress;
var memory = vm.memory;
var cpu = vm.cpu;
var guestOs = vm.guestOS;

var vcacVm = Server.findAllForType("vCAC:VirtualMachine", "ExternalReferenceId eq '" + vm.id + "'")[0];
var expiryDate = vcacVm.expires;
if (expiryDate) {
	expiryDate = expiryDate.toDate();
}

var htmlTemplate = fetchEmailTemplate("VM-Details.html");

var fieldKeyValues = new Properties();
fieldKeyValues.put("{{vmName}}",vmName);
fieldKeyValues.put("{{ipAddress}}",ipAddress);
fieldKeyValues.put("{{guestOs}}",guestOs);
fieldKeyValues.put("{{cpu}}",cpu);
fieldKeyValues.put("{{memory}}",memory);
fieldKeyValues.put("{{expiryDate}}",expiryDate);

for each (field in fieldKeyValues.keys) {
	htmlTemplate = updateContent(field,fieldKeyValues.get(field),htmlTemplate);
}

System.debug("==== Email Content ==== \n" + htmlTemplate);
emailContent = htmlTemplate;

function fetchEmailTemplate(elementName) {
	var categoryPath = "Email-Templates";
	var category = Server.getResourceElementCategoryWithPath(categoryPath);
	for each (var resourceElement in category.resourceElements) {
		if (resourceElement.name.toLowerCase() === elementName.toLowerCase()) {
			var mime = resourceElement.getContentAsMimeAttachment()
			return mime.content;
		}
	}
}

function updateContent(key,value,content) {
	content = content.replace(key,value);
	return content;
}#What does the code do?
In lines 6 to 16 we are retrieving all of the data we need for the email.
Line 18 we retrieve our email template from our resource element, this uses a function within the script (lines 35 to 44).
In lines 20 to 26 we are putting these bits of information in to a Properties object, for the key we are specifying the variable that needs to be replaced within the HTML - for example {{cpu}} is the key name, which relates to line 11 in the HTML template.
Finally in lines 28 to 30, we iterate over each key within the Properties element, find a match within the HTML content and replace it with the relevant value (this uses the function found on lines 46 to 49).
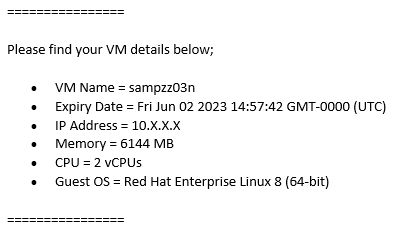
Your email should look something like the below

#How can I utilise this?
Once you have all of the data you need, modify the HTML template to have variables that you need to replace.
Add matching variables in to your Properties object, so a matching key with the correct value/data, and that is it!
Dont forget to map the required inputs and outputs in to the Send notification workflow!
A little side note, if you are using the same variable multiple times within the HTML template, you might need to change the method for replacing the content - you should be able to use a Regex with the /g flag


