I recently came across a requirement where I had to create a site-to-site IPsec VPN, this is usually not an issue, set your Phase 1 and Phase 2 settings, apply your policies and you are good to go, but the difference this time was those local and remote subnets were Public IP addresses.\ The Public IP address our side was also being used as a VIP
Below I will document the steps in getting this working – the issue I had was where I put my policies, and not enabling NAT on the outgoing policy!
#Create your IPsec tunnel;
FortiGate GUI > VPN > IPsec > Tunnels > Create New
Set your name and chose your template. I used “Custom VPN Tunnel (No Template)”
Fill in your Phase1 settings
Fill in your Phase2 settings;
- Local Subnet – this will be your Public IP/Range
- Remote Subnet – this will be their Public IP/Range
Press OK to create the tunnel
#Add in your new route;
FortiGate GUI > Router > Static Routes > Create New
- Destination IP/Mask – this will be the Remote Subnet you entered for your Phase2
- Device – this will be the tunnel you have just created
- Change any of the other settings if you need to
- OK to add the new route
#Create an IP Pool;
FortiGate GUI > Policy & Objects > Objects > IP Pools > Create New
- Add a name and comments if required, and set the type (I am using Overload)
- External IP Range = the range you set for Local Subnet
- Ok to create the IP Pool
#Create your policies;
FortiGate GUI > Policy & Objects > Policy > IPv4 > Create New
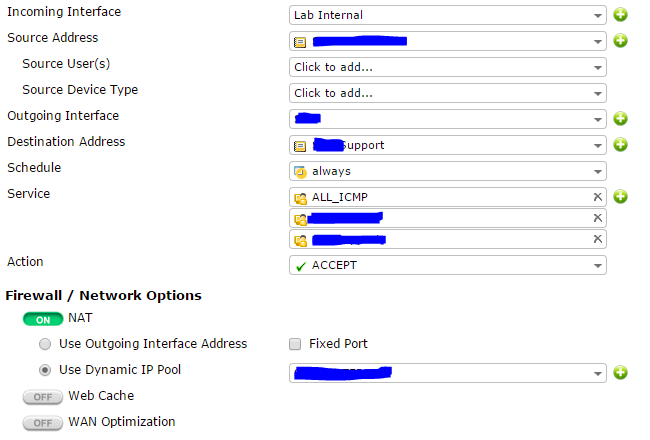
Outgoing
- Incoming Interface = The internal interface where your server exists
- Source Address = An object with the internal IP address of your server
- Outgoing Interface = The tunnel you just made
- Destination Address = An object with the remote Public IP range
- Apply any Schedules and Service restrictions and Action = Accept
You now need to enable NAT, this is the bit I missed at first;
- NAT = On
- Use Dynamic IP Pool = Select the pool you made in the previous step
- Add any other settings and then OK to create your first policy
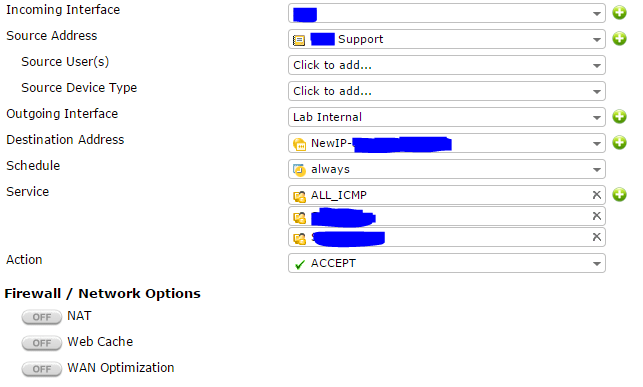
Incoming
- Create the second policy for Tunnel to Internal
- Incoming Interface = The tunnel you just made
- Source Address = An object with the remote Public IP range
- Outgoing Interface = The internal interface where your server exists
- Destination Address = The VIP that belongs to the internal server (same as the IP Pool address)
- Apply any Schedules and Service restrictions and Action = Accept
On this policy you do not need NAT
- NAT = Off
- Add any other settings and then OK to create your first policy
Check to see if your Tunnel is Up and try sending some traffic down it\ FortiGate GUI > VPN > Monitor > IPsec Monitor


